Table of Contents
- Why Cleaning Air Ducts in Older Homes Requires Special Care
- Signs Your Air Ducts Need Cleaning
- Is Professional Air Duct Cleaning Actually Necessary?
- DIY vs. Professional Cleaning: Which Method Works Best
- Professional Cleaning Methods: Negative Air Pressure and Source Removal
- Air Duct Cleaning Frequency for Older Homes
- Common Mistakes to Avoid When Cleaning Older Ductwork
- Health Benefits: Indoor Air Quality and Allergen Reduction
- Frequently Asked Questions
Last Updated: September 22, 2026
Why Cleaning Air Ducts in Older Homes Requires Special Care
Older homes require special attention when you need to clean air ducts older homes, as they have unique challenges maintaining proper ductwork. The ductwork in homes built before 1980 often differs significantly from modern systems in materials, construction methods, and design.
The biggest risk is damaging fragile ductwork. Older ducts may have deteriorated seals, corroded joints, or brittle materials that can’t handle aggressive cleaning methods.
One-size-fits-all cleaning approaches don’t work for older homes. Your home needs a strategy tailored to its age and condition.
The good news: you can clean air ducts in older homes safely. You just need to know what to watch for and which methods work best.
Older homes built before 1985 often contain ductwork with asbestos-containing materials. Do NOT use aggressive brushing or high-pressure methods on these systems. Hire a professional certified in asbestos-safe handling if your home may contain these materials.
Signs Your Air Ducts Need Cleaning
Clean ducts when they actually need it. Here’s what to look for.
Visible dust around vents and registers is the clearest sign. Wipe a white cloth across a vent opening, dark dust means particles are circulating.
Musty or stale odors from vents indicate mold growth or debris buildup inside the ducts.
Increased allergy symptoms or respiratory issues indoors can point to poor air quality. If family members sneeze more or experience itchy eyes and throat, your HVAC system may be circulating allergens.
Visible mold on ductwork or around the air handler is a red flag. Mold grows in damp ducts and spreads spores throughout your home. This requires immediate attention.
Pet hair and dander clogging registers means your ducts are trapping animal hair, restricting airflow and collecting bacteria.
Recently completed home renovation or construction work means dust from drywall, insulation, and other materials has settled in your ducts. Clean them before the dust spreads throughout your home.
Do NOT ignore signs of mold or moisture in your ductwork. These conditions can damage your air handler, evaporator coil, and blower motor. Address the moisture source first, then clean the ducts.
Is Professional Air Duct Cleaning Actually Necessary?
Professional air duct cleaning is necessary when:
- You see visible mold or moisture in ducts
- You notice musty odors or significant dust accumulation
- Your home has experienced water damage or flooding
- You’re moving into an older home and don’t know the duct history, making it important to clean air ducts older homes for safety
- Family members have respiratory conditions or severe allergies
- You’ve completed major renovation work and dust has settled in ducts
Professional cleaning is less urgent when:
- Your ducts are relatively clean with no visible debris
- You have no allergy or respiratory issues
- You maintain good air filter replacement schedules
- Your HVAC system is running efficiently with normal airflow
With older homes, you can’t always see inside your ducts. What looks clean on the surface may hide significant buildup deeper in the system, making professional inspection valuable.
According to EPA guidance on indoor air quality, ductwork integrity directly affects how well your ventilation system removes contaminants. Older homes with compromised seals or deteriorated materials may benefit from professional assessment even if visible contamination isn’t obvious.
Professional cleaning matters most for older homes with visible contamination, moisture problems, or recent renovation work. For routine maintenance, focus on regular filter changes and keeping vents clear of dust.
DIY vs. Professional Cleaning: Which Method Works Best
The choice depends on your comfort level, the condition of your ducts, and what you’re trying to achieve.
What You’ll Need for DIY Cleaning
Using wrong equipment can damage older ductwork, so start with the right tools.
Essential tools for DIY duct cleaning:
- Shop-Vac or HEPA-filter wet/dry vacuum with strong suction
- Duct cleaning brush kit with flexible rods and soft bristles
- Inspection mirror or borescope camera to see inside ducts
- Screwdriver set for removing vent covers and registers
- Dust masks rated N95 or better for protection
- Flashlight or headlamp for visibility
- Drop cloths to contain dust during cleaning
- Painter’s tape to seal off ducts while working
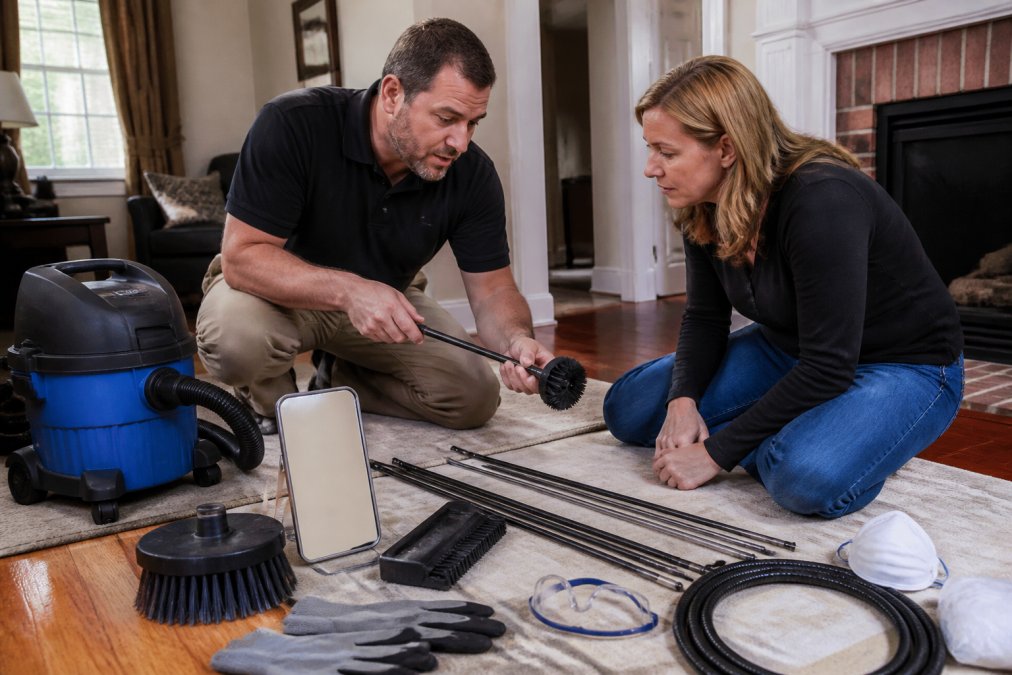
A HEPA vacuum is essential, regular vacuums recirculate dust and allergens. HEPA filters trap 99.97% of particles (the EPA).
Soft-bristle brushes protect older ductwork, hard nylon brushes can scratch or dent metal ducts. Flexible rods let you navigate turns without forcing.
An inspection mirror or camera lets you see what you’re cleaning. Many homeowners find that looking inside ducts changes their strategy.
Step 1: Inspect Your Ductwork for Damage
Look inside accessible ducts for gaps, rust, tears, mold, or deteriorated insulation. Older homes often have dried-out tape that can separate under aggressive brushing. Document findings with photos.
If you find major damage, stop. Call a professional. Cleaning damaged ducts can make problems worse. Loose sections can collapse, restricting airflow throughout your home.
For minor dust accumulation with no visible damage, proceed to step two.
Step 2: Clean Accessible Vents and Registers
Start with the easiest part: cleaning visible surfaces.
Remove all vent covers and registers carefully, older homes may have painted-over covers. Work slowly to avoid breaking them.
Vacuum inside each opening with your HEPA vacuum and soft brush attachment. Work gently to avoid pushing debris deeper.
Wipe down the vent covers and registers with a damp cloth. Dust accumulates on these surfaces and gets pulled back into your ducts. Clean covers improve airflow immediately.
Seal off cleaned vents with painter’s tape while you work on other areas. This prevents dust from recirculating.
Step 3: Use Mechanical Brushing on Main Ducts
This is where most DIY cleaning happens and where caution matters most in older homes.
Connect your brush kit to your HEPA vacuum. Insert the brush into accessible duct openings, pushing gently and rotating as you go.
Never force the brush into ducts. Older ductwork is fragile and forcing equipment can separate joints, tear material, dislodge insulation, or create air leaks.
Work slowly. Brush one section, withdraw, and check what you’ve pulled out. Heavy dust means it’s working; light debris means that section is clean.
Focus on supply and return vents where airflow is strongest. These areas collect the most debris. Avoid pushing the brush too far into the main trunk lines where you can’t see what’s happening.
Step 4: Verify Cleanliness and Airflow
After brushing, confirm your work actually improved things.
Look back into ducts with your inspection mirror. Do you see noticeably less dust? If yes, you’ve succeeded. If you still see heavy accumulation, repeat brushing in that area.
Check your air filter. If it’s clogged with fresh dust from cleaning, your work is done. Replace the filter with a new one.
Feel the airflow at your vents. Does air feel stronger than before? Reduced airflow often improves immediately after cleaning because you’ve removed blockages.
Run your HVAC system for 30 minutes. Listen for any unusual sounds. Older systems sometimes make noise after cleaning as loose debris settles. If noise continues, turn off the system and investigate.
If you hear rattling or grinding sounds, something may have come loose during cleaning. This requires professional inspection.
Professional Cleaning Methods: Negative Air Pressure and Source Removal
Professional air duct cleaning uses equipment and techniques that DIY methods cannot replicate. Understanding how these methods work helps you evaluate whether professional service is worth the investment for your older home.
Negative Air Pressure Systems: The Gentler Approach for Older Ductwork
Negative air pressure cleaning is the safest method for homes with fragile or deteriorating ductwork. Here’s how it works:
A technician seals the return air vent and connects a large-capacity vacuum unit, creating suction throughout your duct network. Debris moves toward the vacuum source, not deeper into the system.
Unlike mechanical brushing, negative pressure doesn’t require pushing equipment through ducts, eliminating risk of separating joints or tearing material.
The process typically takes 2-4 hours. Technicians may use soft brushes to dislodge buildup, but the vacuum continuously pulls debris out.
Source Removal: Targeted Cleaning of Problem Areas
Source removal combines visual inspection with mechanical extraction. Technicians use borescope cameras to locate heavy dust, mold, or blockages, then use soft brushes or controlled compressed air to remove material.
For older homes with patchy dust or localized mold, source removal can be more efficient than treating the entire system uniformly.
The Components DIY Methods Miss
Professional crews clean parts of your HVAC system that are invisible to homeowners and inaccessible without specialized equipment:
- Air handler and blower motor: Dust accumulates on fan blades and inside the handler housing. A clogged blower reduces airflow and forces your system to work harder.
- Evaporator coil: This component is where moisture condenses in air-conditioning mode. Dust buildup on the coil reduces cooling efficiency and creates an ideal environment for mold growth.
- Drain pan and condensate drain line: Moisture collects here. If the drain line clogs, water backs up and promotes mold in the air handler.
- Supply and return plenums: These large chambers at the furnace collect dust before air enters ducts. Cleaning only the ducts leaves contamination here.
Comprehensive cleaning includes these components. Partial cleaning, ducts only, leaves mold and bacteria in the air handler or evaporator coil circulating through your home.
Professional Cleaning vs. DIY: When the Investment Makes Sense
Professional cleaning is most cost-effective when:
Visible mold or moisture is present. Mold requires careful handling to avoid spreading spores. DIY brushing can aerosolize spores and worsen the problem.
Your ductwork shows signs of deterioration. Loose joints, corrosion, tears, or failed seals require professional negative pressure cleaning. DIY brushing risks additional damage.
You’ve completed major renovation work. Professional crews can access and clean areas you cannot reach safely, preventing months of dust circulation.
Your home may contain asbestos-containing ductwork or insulation. Homes built before 1980 sometimes have asbestos in duct insulation, tape, or transite (asbestos-cement) ducts. Disturbing these materials releases fibers. Only professionals certified in asbestos-safe handling should work on these systems.
Your HVAC system is over 15 years old and has never been professionally cleaned. The air handler, evaporator coil, and drain pan may harbor significant mold. Professional inspection reveals whether cleaning will improve performance.
For routine maintenance in clean ducts, DIY cleaning or filter changes may suffice. For older homes with unknown history or visible problems, professional assessment prevents costly damage.
Before hiring a professional, ask whether they use negative air pressure, whether they clean the air handler and evaporator coil, and whether they provide before-and-after photos or video inspection. These details separate thorough work from incomplete service.
Air Duct Cleaning Frequency for Older Homes
How often should you clean air ducts in older homes? There’s no fixed schedule.
Inspect every 3-5 years. If you find visible dust or mold, clean then.
Older homes may need more frequent attention due to deteriorated seals, less efficient filters, poorer moisture control, and harder-working systems.
Homes with pets need more frequent cleaning due to rapid pet hair and dander accumulation.
Homes in dusty environments need more frequent cleaning due to constant dust infiltration.
The best approach: inspect your ducts annually. Look for visible dust accumulation. If you see significant buildup, clean. If ducts look relatively clean, wait another year.
This keeps your system running efficiently without unnecessary cleaning.
Common Mistakes to Avoid When Cleaning Older Ductwork
One wrong move during DIY cleaning can turn maintenance into an expensive repair. Older homes have specific vulnerabilities.
Structural Mistakes That Damage Fragile Ductwork
Mistake 1: Using aggressive high-pressure methods on deteriorated ducts.
High-pressure air or water can separate joints, dent metal ducts, or tear flexible material. Water causes rust and promotes mold growth.
Older homes sometimes have transite ducts, asbestos-cement ducts that are extremely brittle. High-pressure cleaning can crack them, releasing fibers. If you suspect transite ducts, call a professional certified in asbestos-safe handling.
Stick to gentle brushing with soft bristles and vacuum suction. If a brush doesn’t move easily through a duct, stop. Forcing it risks damage.
Mistake 2: Ignoring visible damage before you start cleaning.
If you see holes, tears, or separations, stop. Cleaning damaged ducts spreads contamination and can collapse joints, blocking airflow.
Document damage with photos. Call a professional for assessment. Sealing or replacing damaged sections before cleaning prevents costly mistakes.
Mistake 3: Cleaning only accessible ducts and skipping return air paths.
Return ducts collect more debris than supply ducts. Skipping them leaves half your system dirty and your system continues circulating dust from the uncleaned return side.
Mistake 4: Forcing equipment into ducts that are too narrow or blocked.
If your brush kit doesn’t move smoothly, stop. Forcing equipment can separate joints or tear material. Work gently and try a different approach.
Operational Mistakes That Waste Your Effort
Mistake 5: Not replacing your air filter immediately after cleaning.
Cleaning stirs up dust and your filter will clog within hours. Replace your filter before running your system. Use MERV 8 or higher; check your furnace manual for the recommended rating.
Mistake 6: Using standard or hard-bristle brushes on flexible ducts.
Flexible ducts are fragile and hard nylon brushes tear the inner lining. Use only soft-bristle brushes designed for flexible ductwork.
The Critical Gap: Verifying Your Work Actually Improved Air Quality
Post-cleaning verification:
Use your phone’s camera to photograph duct interiors before and after cleaning. Compare photos for noticeably less dust. If dust levels look similar, deeper buildup may require professional equipment.
Airflow verification:
Feel air from supply vents before and after cleaning. Airflow often improves noticeably. If airflow feels the same or weaker, a separated joint or collapsed duct may be restricting flow, turn off your system and investigate.
Filter inspection:
After 24 hours, check your new filter. Heavy clogging means your cleaning successfully dislodged material. If the filter stays clean, your ducts were already clean or cleaning didn’t reach problem areas.
When to stop and call a professional:
Stop and hire a professional if you encounter: visible mold that returns, persistent musty odors, reduced airflow that doesn’t improve, unusual sounds from your HVAC system, visible ductwork damage, or suspected asbestos-containing materials.
These signs indicate problems beyond DIY scope. Professional assessment prevents further damage and ensures your system is actually improved.
The most expensive mistake is damaging your ductwork during cleaning. A separated joint or torn flexible duct requires professional repair or replacement. Gentle methods and careful inspection prevent this. When in doubt, stop and consult a professional.
Health Benefits: Indoor Air Quality and Allergen Reduction
Clean ducts directly improve what you breathe.
Allergen reduction is immediate. Dust, pollen, pet dander, and mold spores circulate through your home via ductwork. Removing this buildup means less of these allergens in your air. Family members with allergies often report improvement within days.
Mold prevention matters especially in older homes. Moisture in ducts creates ideal conditions for mold growth. Mold spores circulate constantly, triggering respiratory issues and allergies. Cleaning removes existing mold and improving airflow prevents regrowth.
Better airflow means your HVAC system works more efficiently. When ducts are clogged, your system runs longer to maintain temperature. This increases energy use and puts strain on equipment. Clean ducts let air move freely.
Reduced dust in your home is noticeable. You’ll dust furniture less frequently. Your floors stay cleaner longer. This is the most obvious benefit homeowners experience.
Research from EPA indoor air quality resources shows that ductwork cleanliness directly affects airborne particulate matter inside homes. Reducing dust and contaminants in ducts improves overall indoor air quality.
For families with respiratory conditions, asthma, or severe allergies, clean ducts are health maintenance, not optional maintenance.
Keeping your air ducts clean improves comfort and health in your older home. Whether you handle it yourself or hire professionals, the goal is the same: remove dust, prevent mold, and maintain good airflow.
If you’re dealing with significant dust accumulation, visible mold, or moisture problems, professional help saves time and prevents damage to fragile older ductwork. PowerPro Carpet Cleaning offers comprehensive air duct cleaning as part of our complete home maintenance services. Call us at 848-347-3201 to schedule an inspection and get your ducts professionally cleaned.
Frequently Asked Questions
What are the downsides of air duct cleaning in older homes?
The main risks include damaging fragile or deteriorated ductwork, dislodging asbestos-containing materials in homes built before the 1980s, and disturbing accumulated dust that can worsen air quality temporarily. Older ducts may have poor sealing or structural weaknesses that aggressive cleaning can worsen. Professional inspection before cleaning helps identify these hazards and determine whether cleaning is safe for your specific system.
How often should air ducts in older homes be inspected?
Older homes should have air ducts inspected every 2-3 years, or immediately if you notice visible dust around vents, musty odors, or reduced airflow. Homes with pets, smokers, or water damage history may need annual inspections. Regular inspection catches problems early and prevents the buildup of particulate matter, mold growth, and allergens that accumulate faster in aging systems.
Can cleaning old air ducts damage the system?
Yes, aggressive cleaning can damage older ductwork. Mechanical brushing with hard-bristle tools, high-pressure vacuums, or chemical treatments may crack seals, puncture thin duct walls, or loosen asbestos insulation in homes built before 1980. Soft-bristle brushes, gentle suction, and professional assessment reduce this risk. Always hire technicians familiar with older HVAC systems if you choose professional cleaning.
What is the best way to clean air ducts in older homes without hiring professionals?
Start by inspecting accessible vents with a mirror and flashlight. Vacuum return and supply grilles using a HEPA filter vacuum to remove surface dust. Use soft-bristle brush kits attached to a power drill to gently dislodge debris from accessible duct runs. Work carefully to avoid damaging seals or insulation. For deeper cleaning beyond your reach, use negative air pressure methods or hire professionals experienced with older systems rather than risking damage.